If you are looking for Information about PSU Clementine, Go check their Wiki
Security Breach (guide)
 |
This article is a guide and may contain opinions or other subjective information. The PSUPedia is not responsible for any inaccuracies or mistakes. |
Contents
Security Breach
Security Breach is a Partner missions for 2-4 players. The counter is located in the GUARDIANS Branch of Holtes City on Parum.
Rank S
Rank S requires (To be confirmed: Time requirements?)
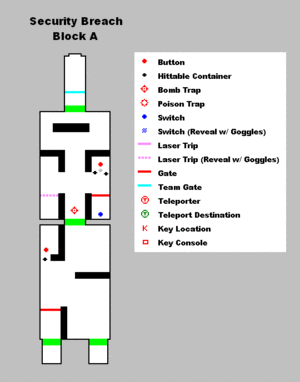
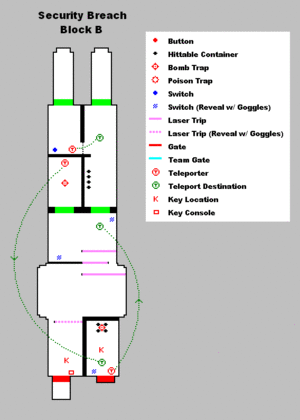
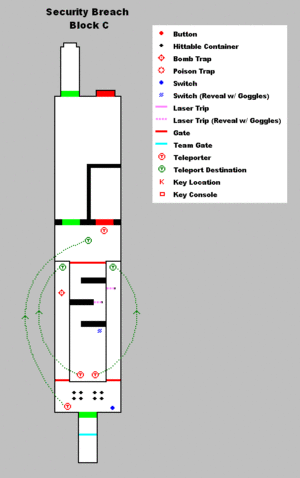
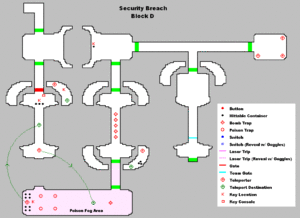
Maps
Walk through
This walk through is written as if there are only two players, as all the puzzles require only two participants at a time. Additional members are free to follow either (or neither) of the two players operating the switches and buttons.
Block A
Start at the top of the map, by the team gate as usual. Proceed south through the door into the first room, which is dark.
As you travel south towards the door with the very visible, very large bomb in front of it, you will see a laser fence to the east. North of the laser fence, on the east side of the room, there are three small containers. Use your goggles to reveal the hit-able middle container (shown gray on the map) and destroy it to get access to the button behind it.
One team member stands on the button to open the fence while another hits the switch behind it. This switch disables the bomb trap allowing you to pass without causing an alarm and, more importantly, without getting killed.
In the next room, kill everything that spawns. To the west is another small container with a button behind it - but you don't have to shoot the container first, just run around it. This button opens the fence blocking the southwest exit. One member holds the fence open while the other exists southwest, and the button-holder them exits using the southeast door.
Block B
At the start of Block B you will be separated from your partner by a wall of containers which you can shoot through. Whichever side you are on, clear out the enemies to activate the teleporter on the west side. The switch on the west side also turns the lights on for this room. Taking the teleporter allows the player(s) who took the west path to rejoin his team mate(s) on the east path.
Proceed south into the next room and use your goggles to find a hidden switch in this area. There are at least two possible locations for the switch, which are marked on the map. The switch deactivates the bomb in the southwest corner of the previous room, which you will enter using the door. Take the teleporter here to the room at the far southeast corner of this block.
In this room, use your goggles to locate the hidden switch in the southwest corner and disable another bomb trap over the crates. Destroy the crates under the bomb (and run up to them) to trigger a spawn. Clear the spawn, collect the key that appears, and take the teleporter back to the start of the second room.
Carefully walk between the laser trips on the floor, which will set off an alarm if touched. Clear the enemies that spawn.
Before heading for the door, use your goggles to reveal another hidden laser trip and run around it by hugging the west wall. Clear more enemies to get the second key and head out to Block C.
Block C
Enter the large room and clear all the enemies here. Head south into another long, dark room and clear the next wave of enemies to open the fence blocking the central path. Use your goggles after you walk around the first pile of containers to reveal a hidden laser trip and walk around it by hugging the east wall.
As you approach the two teleporters to the south, use your goggles again to find the hidden switch which disables the bomb trap on the west path. Splitting up here is optional (and will save time).
Take the west teleporter to the west path, run past the (hopefully deactivated) bomb and clear the enemies to open the fence at the south end into the area with the crates.
Take the east teleporter to the east path, immediately use your goggles to find the hidden laser trip right in front of you and hug the east wall to get around it. Clear the enemies to open the fence at the south end into the area with the crates.
The switch in the southweast corner turns on the lights in this room. The teleporter at the south end brings you back to the north end of this room in case you need to double back (and you will, if you didn't split up earlier).
Open the crates, collect your goodies and meet up at the team gate at the south end of the block.
Block D
PAY ATTENTION TO THE CAMERA FOOTAGE YOU ARE SHOWN. Specifically, One image shows one active and two disabled telporters, and another shows a single crate by a door with key terminal. Remember which teleporter and which crate is shown (relative to the door). Recharge and meet up at the team gate to get started.
Head north and skip the first spawn if you want. Here you can split up and go east and west.
Go east into the room and clear the spawn. All three teleporters activate! Only the one shown active at the start of the block has the key. Going counter-clockwise from the teleporter with the key is the teleporter that will take you to three crates with some potentially special drops. The other teleporter is a death trap. Backtrack from this room to take the west path.
Go west and clear the robots to unlock the door ahead. Enter the room to the west and clear another few waves, then open the crate on the west side to get another key. Exit south.
Use your goggles on the bridge to reveal five bomb traps hovering on it. Clear these off and continue south into the poison room.
The poison room (shown in pink) is filled with a thick magenta fog and deals constant damage while you're in it. Destroy the four poison traps at the far end to clear out the fog (Paradi Cataract is great for this - and so is Giresta. Buff up your CAST and send them in to clear the place out!)
Clear a few waves of robots and turrets to get the key, open the crates if you want and take the teleporter at the far west end of the room to continue.
Once you teleport, destroy the robots in front of and behind you, then head north to see three crates by the door. Only the one shown at the start of the block has the key - the others are deadly bomb traps. Carefully open only the key-containing crate (certain melee weapons are not recommended for this task...) and get the last key to proceed north to the final room.
Clear out the last room to the north and you're done!


