If you are looking for Information about PSU Clementine, Go check their Wiki
Deadly Brilliance (guide)
From The re-PSUPedia
 |
This article is a guide and may contain opinions or other subjective information. The PSUPedia is not responsible for any inaccuracies or mistakes. |
Contents
VR: Mizuraki C.D.
Block A

- The mission will begin once all party members have approached the blue gate. From here, head straight in, taking down the mix of fire and ice Ageetas and Gohmons/Olgohmons.
- When you reach the central portion of this map, clear out the Gohmon/Olgohmon packs to unlock the gates, and then head south. When you enter the southern door (reference point 1 on the map to the right), you'll immediately see three containers in front of a rock wall. This wall can be walked through, and doing so will take you down a long hallway with the first of three discs. Collect the disc and head back to the north.
- Clear the packs of enemies from the northern section of the map, following it to the west as you go. Eventually, you'll reach a dead end with a teleporter and a tree in front of a rock wall (reference point 2 on the map to the right). First, this rock wall can be walked through just like the previous one. Behind it are four containers. When you return to the other side of the rocks, scan the tree with your Goggles and then chop it down. In its place will be a switch. Pressing the switch is not required, however your decision at this point will affect your overall grade and reward. If you activate the switch, the teleporter's destination will be changed to a lone island just southeast of your location. Here you will face numerous enemies that otherwise would be inaccessible. After defeating these enemies, a laser fence will unlock and another teleporter will activate. It will take you to destination 2b.
- If you decided to not activate the switch, entering the teleporter next to it will take you directly to point 2b, skipping over a few groups of enemies, making the highest grade you can receive from the mission an A.
Block B

- Block B is very straightforward... no secrets or tricks to worry about, just plain old killing.
- In this block, you'll be facing fire Ollakas and Tengohgs, with a mixture of fire and ice Gohmons/Olgohmons.
VR: Shikon Islands
Blocks A and B
- Once the full group has gathered at the blue gate, run down the hill and hop on a Floader! The object of the next two blocks will be to collect coins that are scattered across the surface of the water while avoiding explosive mines. You'll also be able to collect the second of three discs in block B of this area.
- Please reference the maps below for full details on coin, disc, booster and mine locations. (Click each image to enlarge them.)
- Each coin (green disc) you collect is worth 100 coins, with a maximum possibility of 3000 coins (30 green discs). Block A contains 1000 coins while block B contains the other 2000.
- In each block, there are sections of the waterway which are blocked off by laser fences. Which of the two fences will be open depends on how many coins you have collected by the time you reach the gates. If you have collected all 1000 coins in block A, the northern gate will be unlocked, leading you through a field of boosters. However, if you have collected between 0 and 900 coins, the eastern gate will be open, taking you through a minefield.
- In block B, if you have collected between 0 and 1900 coins, the western gate will be open, leading you through a narrow path filled with boosters. Be sure to loop around to the northeast to collect numerous coins as well as the second disc. If you have collected 2000 coins up to this point, the northern gate will be open, giving you direct access to the field of coins and the second disc.
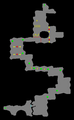
VR: Shikon Islands, block A
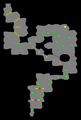
VR: Shikon Islands, block B


Block C

- After racing across the waterways of the Shikon Islands, it's time to get back to the battle on foot. This block serves as a short break to let you recharge and collect a few rewards.
- After the party has gathered at the blue gate, you will either continue on normally or you may see a short cutscene involving one of three NPCs... Ethan Waber, Karen Erra or Mirei Mikuna. If you are greeted by an NPC, they will accompany you for the remainder of the mission.
- At the end of this block, you will find four, six or eight containers. The quantity that appears here depends on how many coins you collected in the previous two blocks. The map to the right has each set of boxes color-coded to help identify which ones will appear.
- 0 - 1900 coins receives four containers. (Four dark green boxes.)
- 2000 - 2900 coins receives six containers. (Four dark green plus two yellow boxes.)
- 3000 coins receives eight containers. (Four dark green, two yellow and two light green boxes.)
- Note that the gemstones and alloys listed in this mission's drop chart only come from the final two boxes received by collecting all 30 coins. The other boxes contain only recovery items, metals and woods.
VR: Shikon Islands, Old Temple
Block A

- This block will split the party up across a series of rooms, each with a few fire and ice Ageetas to defeat, as well as a Kagajibari in the western room. Whoever ends up in the northeastern room should take note before defeating any enemies, as they will be able to walk through the wall directly behind where they appear. This secret hallway will end at reference point 4 on the map to the right, at which point you will see three containers. These containers have a chance of dropping cards, laser cannons and various materials.
- Back to the fight, as each party member clears their room of enemies, a teleporter will appear, taking them to the next room in sequence, allowing the party to regroup and continue. Teleporter sequence is 1a to 1b (central to east), 2a to 2b (east to northeast), 3a to 3b (northeast to west) and 4a to 4b (west to central).
- If playing solo, you will begin in the central room. Taking the teleporter that appears after all of the enemies defeated (reference point 1a) will take you to reference 1b in the eastern room. The teleporter here (reference 2a) will take you to 2b in the northeastern room. As noted above, do not defeat the enemies if you intend to collect the contents of the boxes at the end of the secret hallway. After picking up your loot, return to the northeastern room to clear it. Take the new teleporter (3a) and you will be transported to the western room. As you battle the Ageetas and Kagajibari, be sure to dodge the freezing trap that skates diagonally across the floor. Equipping a Freeze / Resist is recommended.
Block B

- Block B of the old temple begins with an invisible maze. As you make your way through the room, you will be blocked by red laser fences which appear only when you are close enough to touch them. Reference the map to the right for the direct route through.
- Beware of the hammer traps (represented by the orange marks on the map to the right), as they will inflict damage equal to one half of you maximum HP. In other words, if you are caught under one with less than half of your HP, you will not survive the impact.
- Once you reach the switch on the east side of the room and activate it, the laser fences and hammer traps will clear, giving everyone direct access to the exit. This can also be used as an easy way to collect the third and final disc. Otherwise, be sure to collect it while working through the maze.
- When you emerge from the exit, you will encounter a group of Ollakas, or if you're lucky, a small flock of Rappies! Defeat these enemies and move through the final room, taking down the Ageetas and one last Kagajibari before you reach the warp that will transport you back outside to battle an Onmagoug.
VR: Onmagoug nest

- After defeating the Onmagoug, a base number of twelve boxes will appear, with a chance of up to four additional boxes appearing depending on how many discs were collected earlier in the mission.
- Referencing the map to the right, the maroon boxes represent the twelve boxes that will appear if no discs were collected. The red box to the west of the transport crystal will appear if only one disc was collected. If two discs were collected, the red and yellow boxes will appear, and if all three discs were collected, those plus the two green boxes to the east of the crystal will appear.