If you are looking for Information about PSU Clementine, Go check their Wiki
Difference between revisions of "Deadly Brilliance (guide)"
From The re-PSUPedia
m |
(Saving my progress. I'll complete this after while.) |
||
| Line 2: | Line 2: | ||
== VR: Mizuraki C.D. == | == VR: Mizuraki C.D. == | ||
| − | + | === Block A === | |
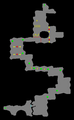
| − | + | [[File:DB Mizuraki A.png|thumb|right|VR: Mizuraki C.D., block A]] | |
| − | + | * The mission will begin once all party members have approached the blue gate. From here, head straight in, taking down the mix of fire and ice [[Ageeta]]s and [[Gohmon]]s/[[Olgohmon]]s. | |
| − | + | * When you reach the central portion of this map, clear out the [[Gohmon]]/[[Olgohmon]] packs to unlock the gates, and then head south. When you enter the southern door (reference point 1 on the map to the right), you'll immediately see three containers in front of a rock wall. This wall can be walked through, and doing so will take you down a long hallway with the first of three discs. Collect the disc and head back to the north. | |
| + | * Clear the packs of enemies from the northern section of the map, following it to the west as you go. Eventually, you'll reach a dead end with a teleporter and a tree in front of a rock wall (reference point 2 on the map to the right). First, this rock wall can be walked through just like the previous one. Behind it are four containers. When you return to the other side of the rocks, scan the tree with your [[Goggles]] and then chop it down. In its place will be a switch. Pressing the switch is not required, however your decision at this point will affect your overall grade and reward. If you activate the switch, the teleporter's destination will be changed to a lone island just southeast of your location. Here you will face numerous enemies that otherwise would be inaccessible. After defeating these enemies, a laser fence will unlock and another teleporter will activate. It will take you to destination 2b. | ||
| + | * If you decided to not activate the switch, entering the teleporter next to it will take you directly to point 2b, skipping over a few groups of enemies, making the highest grade you can receive from the mission an A. | ||
| + | |||
| + | === Block B === | ||
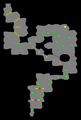
| + | [[File:DB Mizuraki B.png|thumb|right|VR: Mizuraki C.D., block B]] | ||
| + | * Block B is very straightforward... no secrets or tricks to worry about, just plain old killing. | ||
| + | * In this block, you'll be facing fire [[Ollaka]]s and [[Tengohg]]s, with a mixture of fire and ice [[Gohmon]]s/[[Olgohmon]]s. | ||
== VR: Shikon Islands == | == VR: Shikon Islands == | ||
| + | === Blocks A and B === | ||
| + | * Once the full group has gathered at the blue gate, run down the hill and hop on a [[Floader]]! The object of the next two blocks will be to collect coins that are scattered across the surface of the water while avoiding explosive mines. You'll also be able to collect the second of three discs in block B of this area. | ||
| + | * Please reference the maps below for full details on coin, disc, booster and mine locations. (Click each image to enlarge them.) | ||
| + | * Each coin (green disc) you collect is worth 100 coins, with a maximum possibility of 3000 coins (30 green discs). Block A contains 1000 coins while block B contains the other 2000. | ||
| + | * In each block, there are sections of the waterway which are blocked off by laser fences. Which of the two is open depends on if you activated the switch in block A of VR: Mizuraki C.D. or not. If the switch was activated, the northern gate of VR: Shikon Islands block A will be unlocked, leading you through a field of boosters. If it was not activated, the eastern gate will be open, taking you through a minefield. | ||
| + | * In block B of Shikon Islands, if you activated the switch in Mizuraki, the western gate will be open, leading you through a narrow path filled with boosters. Be sure to loop around to the northeast to collect numerous coins as well as the second disc. If the Mizuraki switch was not activated earlier in the mission, the northern gate will be open, giving you direct access to a field of coins and the second disc. | ||
| + | |||
<gallery> | <gallery> | ||
| − | + | File:DB Shikon A.png|VR: Shikon Islands, block A | |
| − | + | File:DB Shikon B.png|VR: Shikon Islands, block B | |
</gallery> | </gallery> | ||
| + | |||
| + | === Block C === | ||
| + | [[File:DB Shikon C.png|thumb|right|VR: Shikon Islands, block C]] | ||
| + | * After racing across the waterways of the Shikon Islands, it's time to get back to the battle on foot. This block serves as a short break to let you recharge and collect a few rewards. | ||
| + | * After the party has gathered at the blue gate, you will either continue on normally or you may see a short cutscene involving one of three NPCs... [[Ethan Waber]], [[Karen Erra]] or [[Mirei Mikuna]]. If you are greeted by an NPC, they will accompany you for the remainder of the mission. | ||
| + | * At reference point 1 on the map to the right, you will find four, six or eight containers. The quantity that appears here depends on how many coins you collected in the previous two blocks. | ||
| + | ** 0 - 19 coins receives four containers. | ||
| + | ** 20 - 29 coins receives six containers. | ||
| + | ** 30 coins receives eight containers. | ||
| + | * Note that the gemstones and alloys listed in this mission's drop chart only come from the final two boxes received by collecting all 30 coins. The othe boxes contain only recovery items, metals and woods. | ||
== VR: Shikon Islands, Old Temple == | == VR: Shikon Islands, Old Temple == | ||
| − | + | === Block A === | |
| − | + | [[File:DB Temple A.png|thumb|right|VR: Old Temple, block A]] | |
| − | + | ||
| − | + | === Block B === | |
| + | [[File:DB Temple B.png|thumb|right|VR: Old Temple, block B]] | ||
Revision as of 03:16, 1 August 2010
 |
This article is a guide and may contain opinions or other subjective information. The PSUPedia is not responsible for any inaccuracies or mistakes. |
Contents
VR: Mizuraki C.D.
Block A

- The mission will begin once all party members have approached the blue gate. From here, head straight in, taking down the mix of fire and ice Ageetas and Gohmons/Olgohmons.
- When you reach the central portion of this map, clear out the Gohmon/Olgohmon packs to unlock the gates, and then head south. When you enter the southern door (reference point 1 on the map to the right), you'll immediately see three containers in front of a rock wall. This wall can be walked through, and doing so will take you down a long hallway with the first of three discs. Collect the disc and head back to the north.
- Clear the packs of enemies from the northern section of the map, following it to the west as you go. Eventually, you'll reach a dead end with a teleporter and a tree in front of a rock wall (reference point 2 on the map to the right). First, this rock wall can be walked through just like the previous one. Behind it are four containers. When you return to the other side of the rocks, scan the tree with your Goggles and then chop it down. In its place will be a switch. Pressing the switch is not required, however your decision at this point will affect your overall grade and reward. If you activate the switch, the teleporter's destination will be changed to a lone island just southeast of your location. Here you will face numerous enemies that otherwise would be inaccessible. After defeating these enemies, a laser fence will unlock and another teleporter will activate. It will take you to destination 2b.
- If you decided to not activate the switch, entering the teleporter next to it will take you directly to point 2b, skipping over a few groups of enemies, making the highest grade you can receive from the mission an A.
Block B

- Block B is very straightforward... no secrets or tricks to worry about, just plain old killing.
- In this block, you'll be facing fire Ollakas and Tengohgs, with a mixture of fire and ice Gohmons/Olgohmons.
VR: Shikon Islands
Blocks A and B
- Once the full group has gathered at the blue gate, run down the hill and hop on a Floader! The object of the next two blocks will be to collect coins that are scattered across the surface of the water while avoiding explosive mines. You'll also be able to collect the second of three discs in block B of this area.
- Please reference the maps below for full details on coin, disc, booster and mine locations. (Click each image to enlarge them.)
- Each coin (green disc) you collect is worth 100 coins, with a maximum possibility of 3000 coins (30 green discs). Block A contains 1000 coins while block B contains the other 2000.
- In each block, there are sections of the waterway which are blocked off by laser fences. Which of the two is open depends on if you activated the switch in block A of VR: Mizuraki C.D. or not. If the switch was activated, the northern gate of VR: Shikon Islands block A will be unlocked, leading you through a field of boosters. If it was not activated, the eastern gate will be open, taking you through a minefield.
- In block B of Shikon Islands, if you activated the switch in Mizuraki, the western gate will be open, leading you through a narrow path filled with boosters. Be sure to loop around to the northeast to collect numerous coins as well as the second disc. If the Mizuraki switch was not activated earlier in the mission, the northern gate will be open, giving you direct access to a field of coins and the second disc.
VR: Shikon Islands, block A
VR: Shikon Islands, block B


Block C

- After racing across the waterways of the Shikon Islands, it's time to get back to the battle on foot. This block serves as a short break to let you recharge and collect a few rewards.
- After the party has gathered at the blue gate, you will either continue on normally or you may see a short cutscene involving one of three NPCs... Ethan Waber, Karen Erra or Mirei Mikuna. If you are greeted by an NPC, they will accompany you for the remainder of the mission.
- At reference point 1 on the map to the right, you will find four, six or eight containers. The quantity that appears here depends on how many coins you collected in the previous two blocks.
- 0 - 19 coins receives four containers.
- 20 - 29 coins receives six containers.
- 30 coins receives eight containers.
- Note that the gemstones and alloys listed in this mission's drop chart only come from the final two boxes received by collecting all 30 coins. The othe boxes contain only recovery items, metals and woods.

