If you are looking for Information about PSU Clementine, Go check their Wiki
Red and Green (guide)
From The re-PSUPedia
 |
This article is a guide and may contain opinions or other subjective information. The PSUPedia is not responsible for any inaccuracies or mistakes. |
The number of chips collected determines both overall rank and number of boxes that appear after the boss battle. A minimum of 23 chips is required for S rank on both sides.
Contents
Chip locations
Uncontaminated field
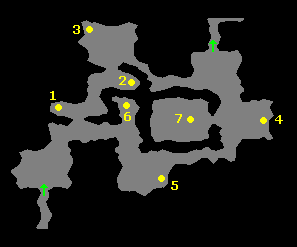
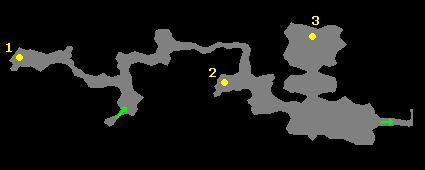
Block 2-A
- Upon entering this block, follow the left path until you reach a dead end with four containers in it. The first chip can be found in the middle of these containers.
- Return to the entrance area and take the other path which leads north and then east. Defeat the enemies as you go to unlock a fence blocking the entrance to a tunnel. Continue through this tunnel until you exit the other side. Turn to the right of the exit and you'll see the second data chip behind two containers.
- Work your way to the end of the block until you come to a clearing with a hill to your left. Climb the hill and you'll find a smaller enclosure with a massive tree in it. Using your Goggles, scan the tree's trunk to identify a weak spot, and then start hacking away. After hitting the trunk ten times, a wave of enemies will appear. Defeat them, and then continue to attack the tree, this time hitting it twenty times. More enemies will spawn, but once they have been destroyed, you can focus once again on the tree. This time it will take an additional thirty hits to bring it down. Once the tree has fallen, defeat the new enemies that spawn, and collect the three data chips that appear in the grass.
Block 3-A
- Move forward until you make the first right turn. Immediately turn left to climb a small hill with three containers on it. Destroy them to find the first chip of this block.
- Continue across the hill, defeating enemies as you go. Once all of the enemies on the hill have been killed, a data chip will appear in an alcove at the end of the hill before it descends into an open field.
- Descend the hill and defeat the enemies that spawn in the field. Once they all have been destroyed, this block's third data chip will appear in the northwest corner of the field.
- Continue on until you reach the open area on the east side of the block. Defeat the enemies here and the fourth chip will appear close to the treeline.
- As you continue through the area, you should notice that you're looping back to the beginning of the block. Once you reach a clearing in the south, kill the native creatures that spawn, and the fifth data chip will appear in front of the rock wall in the southeast corner.
- Head north to close up the loop of this block, defeating enemies as you go. You'll notice three containers in a dead end ahead of you. Destroy them to locate the sixth chip.
- Leaving the dead end, head west (back to the entrance) and you'll see a newly activated teleporter. If you have collected all of the chips and defeated all of the enemies of the block thus far, the teleporter will put you in front of the block's exit. Before running through the exit, however, turn right and check out the hill that was once blocked by a large rock wall. The rocks should now be gone, allowing you to obtain the final chips of the block. Atop the hill is another massive tree. As with your previous encounter with a tree of similar stature, scan it, then hit it ten, twenty and thirty times, defeating the waves of enemies that appear between hits. After felling the tree, a final wave of enemies will spawn. Defeat them and collect the four chips that appear.
Block 4-A
- The number of data chips you receive from the final block is determined by the amount of time it takes to defeat all of the enemies that spawn. The maximum number you can receive is eight, while the minimum is two. After clearing all of the enemies, be sure you have collected all of the drops you want before approaching the blue gate to collect your chips, as once the chips have been collected, you will immediately enter a battle against De Ragan, and all drops in the field will disappear.
Fire-contaminated field
Block 2-B
- Upon entering this block, take the left path until you reach a dead end with four SEED-Zomas. Destroy them to uncover two data chips.
- Return to the entrance area and take the path that leads forward, defeating enemies along the way to unlock a fence blocking the entrance to a tunnel. Continue through the tunnel until you exit the other side. Turn to the right of the exit and scan the area with your Goggles. You'll see two green dots which will turn into SEED-Zomas after being scanned. Destroy them for two more chips.
- Keep moving ahead until you reach a clearing with a hill to the left. Climb over the hill and you'll reach a smaller field with a SEED-Blewme in it. Scan the Blewme and begin attacking it. After ten attacks, the lava pool surrounding the blossom will enlarge and a group of enemies will spawn. Defeat the enemies and repeat, this time attacking the Blewme twenty times. At this point, the pool will grown one more time, but the Blewme itself will shatter, leaving an exposed SEED core. Defeat the new enemies and then go after the core. Attack it thirty times to destroy it, making one final wave of enemies spawn. Defeat them and five data chips will appear.
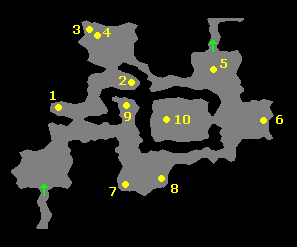
Block 3-B
- Move forward until you make the first right turn. Immediately turn left to climb a small hill with three SEED-Zomas on it. Destroy them to reveal a data chip.
- Continue across the hill, defeating enemies as you go. After all of the enemies on the hill have been destroyed, a chip will appear at the end of the hill, in an area off to the side of the area of descent.
- Descend the hill, but do not kill the enemies that spawn. Instead, run over to the two SEED-Zoma toward the back of the clearing and destroy them. Two chips will appear. Now you may destroy the enemies.
- After defeating all of the enemies in this clearing, another chip will appear where the other two chips were located.
- Moving on, you'll reach a set of five SEED-Zomas in front of an unlocked gate. Scan the Zomas to reveal a data chip. Be sure to scan for this chip before destroying all of the Zomas.
- Do not go through the unlocked gate. Instead, continue around the area (heading roughly southeast). Defeat the enemies that spawn in this little enclosure and a chip will appear close to the treeline.
- Continue around the loop of the area until you reach another clearing with two SEED-Zomas in it. As with an earlier instance, do not kill the enemies. Instead, destroy the Zomas first to find two chips. Now you may destroy the enemies.
- Once all of the enemies in this clearing have been defeated, another chip will appear by a large rock wall.
- Moving along, you will be closing up the looped path of this block. As you do, you should see three SEED-Zomas in a small dead end. Destroy them to find a data chip. The Go Bajillas which spawned upon your approach can also be destroyed.
- Leaving the dead end and closing the loop around, you'll come to a teleporter. If you have collected all of the chips and defeated all of the enemies of this block thus far, the teleporter will put you in front of the block's exit. Before running through the exit, however, turn right and check out the hill that was once blocked by a large rock formation. The rocks should now be gone, allowing you to obtain the final chips of the block. Atop the hill is another SEED-Blewme surrounded by a pool of lava. As with your previous encounter with this fiery flower, scan it, then hit it ten, twenty and thirty times, defeating the waves of enemies that appear between hits. After withering the Blewme and destroying the core, a final wave of enemies will appear. Defeat them and six more chips will appear.
Block 4-B
- The number of data chips you receive from the final block is determined by the amount of time it takes to defeat all of the enemies that spawn. The maximum number you can receive is twelve, while the minimum is two. After clearing all of the enemies, be sure you have collected all of the drops you want before approaching the blue gate to collect your chips, as once the chips have been collected, you will immediately enter a battle against De Ragan, and all drops in the field will disappear.


