If you are looking for Information about PSU Clementine, Go check their Wiki
Her Secret Mission (guide)
 |
This article is a guide and may contain opinions or other subjective information. The PSUPedia is not responsible for any inaccuracies or mistakes. |
Contents
Introduction
Her Secret Mission is a party mission accessible from the GUARDIANS HQ located on planet Neudaiz. A party consisting of 2-4 players is required.
Rank requirements
Rank is based on time and samples collected. The number of defeated enemies does not affect rank.
| LV | Time |
|---|---|
| C | Within 15:00 |
| B | Within 22:00 |
| A | Within 30:00 |
| S | Within 18:00 |
- Collecting all 20 samples yields S-rank. 17 for A, 10 for B and 7 for C.
- Some samples require shooting in first person mode.
- Four people and a bow or rifle are required to collect a certain sample.
- Samples are always in the same places except in block 3.
- A switch in the block 4 unlit Olgohmon room will make a sample uncollectable. Do not press this switch.
- A switch in the block 4 last Kagajibari room can be pressed to prompt the party leader to end the mission.
- As with all party missions, Scape Dolls cannot be used. Incapacitation leads to immediate failure.
Maps
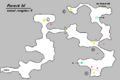
Forest B1
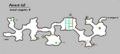
Forest B2
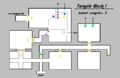
Temple B3
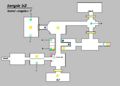
Temple B4


- Blue rectangles represent fake walls on temples b1 and b2.
- Some samples appear in variable locations marked with semi-circles. They will either be in one location or the other, one of them will be a fake sample.
- The switch with a '!' is the one you do not press.
Walkthrough
Decide who will go left and who will go right.
Block 1
There are 4 samples in block 1.
- One person with a gun goes to the north room and shoots the bottom 2 switches, picks up the key, then the sample. Everyone else goes right and waits at the door.
- One person with a gun shoots the 3 switches in the water and picks up the sample that spawns, while the rest of the party clears the area.
- Party splits up. Both pathes are littered with floor traps. Use googles to see a safe path.
- One group goes left. The sample is in a tree on a path to the left of the door. Shot the fruit for the sample. Clear the enemies to get a key.
- One group goes right, and clear the area. Two people step on switches, the gates will stay open. Take the sample, key, and warp.
Block 2

There are 6 samples in block 2.
- Party splits up.
- One group goes left, into a warp. The sample is in the tree. Clear the enemies to get a key. Unlock the left gate.
- The other group went forward. Sample was in the tree south of the gate. Cleared the enemies to get a key, and met up with the others.
- Go through the maze using the path on this map. Take the sample along the way.
- Clear the enemies. Three people stay on the switches to let a rifle or bow user in. This gate will not stay open. Shot the 3 switches in the water, pick up the sample and move on.
- Short characters may have trouble with some shots. Aim slightly above the switch.
- A sample is in the left poison plant. Clear the enemies to get a key.
- A sample is by a PP cube on the path to the left of the door.
Block 3
There are 3 samples in block 3. Red orbs are explosive fakes. Split up and clear the first rooms of enemies. There are only three spawn patterns for the block 3 samples.
| First rooms | What to do | Samples | Meaning |
|---|---|---|---|
| Sample in first room on the right | Tell left team to backtrack and join right team. Someone collect the fake wall sample. |
first right room, fake wall, and fence maze | No samples on left side |
| Sample in first room on the left | Both teams continue on. | first left room, unlit tengoh room, and fence maze. | No samples on right side |
| No sample in either room | Both teams continue on. Someone collect the deadend boxes sample. |
unlit tengoh room, deadend boxes, and last area. | No sample in fence maze |
- One group goes left, clears two areas, unlocks a gate and waits.
- One group goes right, to the far east dead end and counts the number of boxes. Clear areas along the way.
- Two boxes means to go north. Three means to go south.
- Go back and clear the correct room for a key and two warps. The person working the switches takes the right warp. The other takes the left and opens the locked gate.
- The switches control the fence maze. The pattern is far, mid, far, mid, near.
- Once someone is through the maze, they will hit a switch and all three control switches will turn green. Take the warp, rejoin the others and clear the room.
- The exit will split up the team automatically. The first and third person to go through will be odd team. Second and fourth will be even team.
Block 4
There are 7 samples in block 4. Even team will start on the north side of the block, odd will start on the south side.
- Even team, go forward into the next room then split up.
- Someone clears the room, gets a key and goes back to open a locked gate, then clears the next area.
- The other goes left through two fake walls to a sample, then down the stairs to another sample, hits a switch, then helps clear the next area.
- Once the area is cleared, a gate will open. One person waits while the other goes south and hits the switch to the left and is fenced in. Clear the spawn for a sample and go back to find a warp. Ignore the enemies, the others will open the gates. Take the sample and take the warp.
- Odd team, go forward and clear the area and wait for the others. One person will use the switches to open the gates below while the other clears the area again.
- Once everything is clear, the south room will open.
- Do not hit the switch in this room.
- Take the sample and clear the room. Take the key, go back, take the right gate and take the sample. Warp to the last Kagajibari room. Clear the room for the last sample.
- Abandon after the completion screen to avoid Bunami's cut-scene.
Avoiding incapacitation
- Avoid being frozen or trapped.
- Be careful around dambarta using enemies.
- Memorize the placement of floor traps.
- Kagajibari can spin, dealing massive damage to anyone caught in the attack. They usually do this after being staggered. Using launch, blow away or wipeout attacks will almost always provoke the spinning. Avoid using these attacks unless the Kagajibari can be prevented from attacking.
- Dark Kagajibari will fire high-level Megid at players and can use Megiverse, even while moving. Avoid using Dark element attacks unless the Kagajibari can be prevented from attacking.
Saving time
- Avoid using a launch or blow away effect on Komazli, which will always make them warp.
- Kamatoze, Tengohg, and Kagajibari have high HP. Burn effects work well.
Mission Level S changes

- Enemy spawns replaced:
| LV A | LV S |
|---|---|
| |
|
| |
|
| |
|
| |
|
| |
|
- No enemy buffed except for
 Rappy Polec.
- Block 2 door maze changed. The last top left door will not open until all eight rooms of the maze are passed through.
- Four boxes added to the corners of the block 4 last Kagajibari room. Opening the northwestern box sets off a trap. When broken, all players in the room take a large amount of damage.
Recommended equipment
Mission LV C-A
- Weapons Attributes: Fire and ice. Any non-dark for Kagajibari, though lightning is recommended.
- Line shield Attributes: Ice and fire. These two elements will only spawn together once in the unlit Olgohmon room.
Mission LV S
- Weapons Attributes: Fire and dark. Most enemies are ice, some light. Any non-dark for Kagajibari, though lightning is recommended.
- Line shield Attributes: Ice and light. Most enemies are ice.