If you are looking for Information about PSU Clementine, Go check their Wiki
Scorched Valley (guide)
From The re-PSUPedia
 |
This article is a guide and may contain opinions or other subjective information. The PSUPedia is not responsible for any inaccuracies or mistakes. |
Block 1
- After the party has gathered at the blue gate, the mission will begin. Be sure that at least one person in your group has a pair of Goggles, otherwise you will not be able to complete the mission.
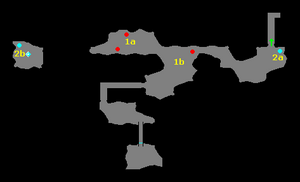
- Cross the first bridge and take out the initial spawns of Vandas/Vanda Merhas. Once cleared, the door leading into the tunnel will unlock. Go through the tunnel to the central area of the map (reference point 1b).
- In the central region, a few packs of Vandas will spawn. Take them down and then move to the northwestern area (reference point 1a). Clear out all of the enemies that spawn, then collect the information key that appears. Head back to the central region and clear out the packs of Vandas that spawn. A second key will appear, letting you unlock the laser fence blocking the way.
- Aside from the fence, however, there is also a pool of lava in the way. Using you Goggles, scan the pool to make a SEED-Zoma appear. Purify it using your Photon Eraser, unlock the gate and move ahead.
- In the next room, simply clear out all of the enemies that spawn. Collect the key that appears to unlock the way to the next block.
- Before moving to the next block, if you need to recharge your weapons, go through the teleporter that opened up next to the door (point 2a). It will warp you to point 2b, a small area on the west side of the map. Recharge your weapons using the PP cube, then return through the warp and on to block 2.
Block 2
- Notes to be added soon.
Block 3
- Notes to be added soon.
Block 4
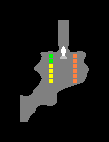
- While it is possible to receive no boxes at the end of the mission, that only happens if very few enemies are defeated in the mission. Generally speaking, if you make it to the third block, you will at least be rewarded with six boxes. On the map to the right, they are the ones that appear in orange on the east side of the room.
- Additional boxes (up to six) will appear on the west side of the room if you are able to clear the mission with some time remaining.
- If between 0:01 and 4:59 remain on the clock, you will be rewarded with four boxes. (The yellow boxes.)
- If at least 5:00 remain, you will be rewarded with six boxes. (The yellow and green boxes.)


