If you are looking for Information about PSU Clementine, Go check their Wiki
Difference between revisions of "Scorched Valley (guide)"
m (I'll finish this tomorrow.) |
(B3 coming soon.) |
||
| Line 1: | Line 1: | ||
{{Guide}} | {{Guide}} | ||
| + | This guide pertains specifically to the [[GUARDIANS Chronicle]] version of [[Scorched Valley (G Chronicle mission)|Scorched Valley]], however the basic layout and mechanics of the mission still apply to the original [[Operation Firebreak]] version. | ||
| + | |||
| + | [[Scorched Valley (G Chronicle mission)|Scorched Valley]] takes you through a simulation of a fire-contaminated Galenigare Canyon where you must eradicate as many infected creates as possible within a certain time limit. You will be given 20 minutes to complete this task on difficulties C-A, and 25 minutes on S-S3. [[Goggles]] are required to complete this mission, so make sure that you or at least one party member has a pair. [[Photon Eraser]]s are also required, however those will be supplied at the beginning of the mission, then collected after the mission is cleared. | ||
== Block 1 == | == Block 1 == | ||
[[File:SV B1.png|thumb|right|Block 1]] | [[File:SV B1.png|thumb|right|Block 1]] | ||
| − | * After the party has gathered at the blue gate, the mission will begin. Be sure that at least one person in your group has a pair of [[Goggles]], otherwise you will not be able to complete | + | * After the party has gathered at the blue gate, the mission will begin. Be sure that at least one person in your group has a pair of [[Goggles]], otherwise you will not be able to complete this mission. |
* Cross the first bridge and take out the initial spawns of [[Vanda]]s/[[Vanda Merha]]s. Once cleared, the door leading into the tunnel will unlock. Go through the tunnel to the central area of the map (reference point 1b). | * Cross the first bridge and take out the initial spawns of [[Vanda]]s/[[Vanda Merha]]s. Once cleared, the door leading into the tunnel will unlock. Go through the tunnel to the central area of the map (reference point 1b). | ||
| − | * In the central region, a few packs of [[Vanda]]s will spawn. Take them down and then move to the northwestern area (reference point 1a). Clear out all of the enemies that spawn, then collect the | + | * In the central region, a few packs of [[Vanda]]s will spawn. Take them down and then move to the northwestern area (reference point 1a). Clear out all of the enemies that spawn, then collect the key that appears. Head back to the central region and clear out the packs of [[Vanda]]s that spawn. A second key will appear, letting you unlock the laser fence blocking the way. |
| − | * | + | * Before you can make your way to the fence terminal, however, you'll have to take care of the pool of lava in front of it. Using you [[Goggles]], scan the pool to make a [[SEED-Zoma]] appear, then purify it using your [[Photon Eraser]]. Unlock the gate and move ahead. |
* In the next room, simply clear out all of the enemies that spawn. Collect the key that appears to unlock the way to the next block. | * In the next room, simply clear out all of the enemies that spawn. Collect the key that appears to unlock the way to the next block. | ||
| − | * Before moving to the next block, if you need to recharge your weapons, go through the teleporter that opened up next to the door (point 2a). It will warp you to point 2b, a small area on the west side of the map. Recharge your weapons using the PP cube, then return through the warp and on to block 2. | + | * Before moving to the next block, if you need to recharge your weapons, go through the teleporter that opened up next to the door (point 2a). It will warp you to point 2b, a small area on the west side of the map. Recharge your weapons using the PP cube, then return through the warp and move on to block 2. |
== Block 2 == | == Block 2 == | ||
[[File:SV B2.png|thumb|right|Block 2]] | [[File:SV B2.png|thumb|right|Block 2]] | ||
| − | * | + | * Block 2 is much more wide open than the first. Here you'll encounter numerous [[Naval]]s and [[Jishagara]]s. |
| + | * For the first two rooms, eliminate all of the enemies to unlock the laser fences. Once you get to the land bridge that leads from the second area to the third, however, you will have to purify a series of [[SEED-Zoma]] (reference point 1). Scan the lava pools with your [[Goggles]] to identify the Zoma, then purify each one with your [[Photon Eraser]] to clear the path. | ||
| + | * Clear the enemies from the next room and cross the bridge heading east. The end is blocked by another lava pool and [[SEED-Zoma]] (reference point 2). Scan, purify, proceed. | ||
| + | * Defeat the enemies in this next room, but be careful not to step into any of the lava pools. While it isn't necessary to neutralize them by purifying their [[SEED-Zoma]], it can be useful if you are in need of extra room. | ||
| + | * Once the enemies in the next room are defeated, a teleporter (reference 3a) will activate. Go through it and you will be warped to point 3b back to the southwest. Again, steer clear of the lava while eradicating the enemies in this area (or purify the [[SEED-Zoma]] if you so desire). | ||
| + | * Head east over the bridge and defeat the next spawn of monsters. Once cleared, a laser fence will deactivate, clearing a path to the north... which is completely blocked by lava. Scan the pools to make the [[SEED-Zoma]] appear, then purify them to clear a path to the final room of this block. | ||
| + | * After defeating all of the enemies in this room, a key will appear. Collect it and go through the newly activated warp (3c). This will place you right before the locked gate that leads to block 3. Use your key and move ahead. | ||
== Block 3 == | == Block 3 == | ||
| Line 20: | Line 29: | ||
== Block 4 == | == Block 4 == | ||
[[File:SV B4.png|thumb|right|Block 4]] | [[File:SV B4.png|thumb|right|Block 4]] | ||
| − | * While it is possible to receive no boxes at the end of | + | * While it is possible to receive no boxes at the end of this mission, that only happens if very few enemies are defeated and little progress is made. Generally speaking, if you make it to the third block, you will at least be rewarded with six boxes. On the map to the right, they are the ones that appear in orange on the east side of the room. |
* Additional boxes (up to six) will appear on the west side of the room if you are able to clear the mission with some time remaining. | * Additional boxes (up to six) will appear on the west side of the room if you are able to clear the mission with some time remaining. | ||
| − | ** If | + | ** If the mission is cleared with less than 5:00 on the clock, you will be rewarded with four boxes. (The yellow boxes.) |
| − | ** If | + | ** If 5:00 or more remain, you will be rewarded with six boxes. (The yellow and green boxes.) |
Revision as of 17:58, 3 August 2010
 |
This article is a guide and may contain opinions or other subjective information. The PSUPedia is not responsible for any inaccuracies or mistakes. |
This guide pertains specifically to the GUARDIANS Chronicle version of Scorched Valley, however the basic layout and mechanics of the mission still apply to the original Operation Firebreak version.
Scorched Valley takes you through a simulation of a fire-contaminated Galenigare Canyon where you must eradicate as many infected creates as possible within a certain time limit. You will be given 20 minutes to complete this task on difficulties C-A, and 25 minutes on S-S3. Goggles are required to complete this mission, so make sure that you or at least one party member has a pair. Photon Erasers are also required, however those will be supplied at the beginning of the mission, then collected after the mission is cleared.
Block 1
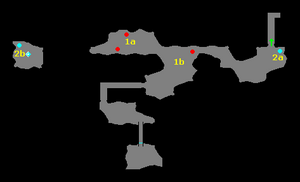
- After the party has gathered at the blue gate, the mission will begin. Be sure that at least one person in your group has a pair of Goggles, otherwise you will not be able to complete this mission.
- Cross the first bridge and take out the initial spawns of Vandas/Vanda Merhas. Once cleared, the door leading into the tunnel will unlock. Go through the tunnel to the central area of the map (reference point 1b).
- In the central region, a few packs of Vandas will spawn. Take them down and then move to the northwestern area (reference point 1a). Clear out all of the enemies that spawn, then collect the key that appears. Head back to the central region and clear out the packs of Vandas that spawn. A second key will appear, letting you unlock the laser fence blocking the way.
- Before you can make your way to the fence terminal, however, you'll have to take care of the pool of lava in front of it. Using you Goggles, scan the pool to make a SEED-Zoma appear, then purify it using your Photon Eraser. Unlock the gate and move ahead.
- In the next room, simply clear out all of the enemies that spawn. Collect the key that appears to unlock the way to the next block.
- Before moving to the next block, if you need to recharge your weapons, go through the teleporter that opened up next to the door (point 2a). It will warp you to point 2b, a small area on the west side of the map. Recharge your weapons using the PP cube, then return through the warp and move on to block 2.
Block 2
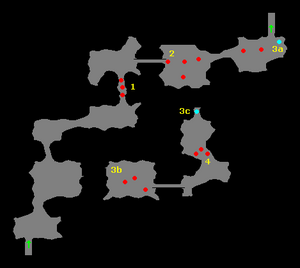
- Block 2 is much more wide open than the first. Here you'll encounter numerous Navals and Jishagaras.
- For the first two rooms, eliminate all of the enemies to unlock the laser fences. Once you get to the land bridge that leads from the second area to the third, however, you will have to purify a series of SEED-Zoma (reference point 1). Scan the lava pools with your Goggles to identify the Zoma, then purify each one with your Photon Eraser to clear the path.
- Clear the enemies from the next room and cross the bridge heading east. The end is blocked by another lava pool and SEED-Zoma (reference point 2). Scan, purify, proceed.
- Defeat the enemies in this next room, but be careful not to step into any of the lava pools. While it isn't necessary to neutralize them by purifying their SEED-Zoma, it can be useful if you are in need of extra room.
- Once the enemies in the next room are defeated, a teleporter (reference 3a) will activate. Go through it and you will be warped to point 3b back to the southwest. Again, steer clear of the lava while eradicating the enemies in this area (or purify the SEED-Zoma if you so desire).
- Head east over the bridge and defeat the next spawn of monsters. Once cleared, a laser fence will deactivate, clearing a path to the north... which is completely blocked by lava. Scan the pools to make the SEED-Zoma appear, then purify them to clear a path to the final room of this block.
- After defeating all of the enemies in this room, a key will appear. Collect it and go through the newly activated warp (3c). This will place you right before the locked gate that leads to block 3. Use your key and move ahead.
Block 3
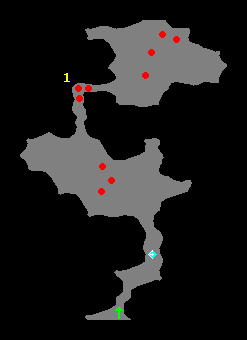
- Notes to be added soon.
Block 4
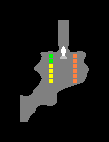
- While it is possible to receive no boxes at the end of this mission, that only happens if very few enemies are defeated and little progress is made. Generally speaking, if you make it to the third block, you will at least be rewarded with six boxes. On the map to the right, they are the ones that appear in orange on the east side of the room.
- Additional boxes (up to six) will appear on the west side of the room if you are able to clear the mission with some time remaining.
- If the mission is cleared with less than 5:00 on the clock, you will be rewarded with four boxes. (The yellow boxes.)
- If 5:00 or more remain, you will be rewarded with six boxes. (The yellow and green boxes.)


